Winpal Wi-Fi printer setting
How to use a Wi-Fi printer? How to set up to quickly connect to a Wi-Fi printer?
Before starting,Make sure you know the Wi-Fi network name (SSID) and its password.
Winpal printers below support Wi-Fi connectivity:
DESKTOP 4 inch 108mm label printer : WPB200 WP300A WP-T3A
DESKTOP 3 inch 80mm label printer : WP80L
DESKTOP 3 inch 80mm receipt printer : WP230C WP230F WP230W
DESKTOP 2 inch 58mm label and receipt printer : WP-T2B
PORTABLE 3 inch 80mm label and receipt printer: WP-Q3A
PORTABLE 3 inch 80mm receipt printer: WP-Q3B
PORTABLE 2 inch 58mm receipt printer: WP-Q2B
The Wi-Fi module used in the printer is low power consumption embedded Wi-Fi module,it adopts static IP (IP shall not have any conflict with other devices that are connected with the router).Turn on printer,users could set up Wi-Fi module by tools,in the option of network setting.
The working mode of Wi-Fi module is to use:STA+Server(TCP Protocol),e.g.the server mode.The server mode supports text printing and driver printing.Once the setting is made,the printer will connect with server automatically.
Wi-Fi printer setting
It is to achieve the Wi-Fi working parameters setting,the connection between printer with the wireless router.
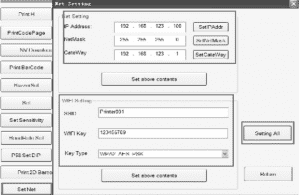
1. Please make sure the computer is connected with the wireless router.Connect the printer with USB line,turn on the printer.In CD,open the “tools”for printer,find the printer setting,choose the right usb port,print test page,if print successfully,turn to”Advanee”setting,see the picture as below:
2. Click”network setting”,set up the printer IP address,subnet mask,gateway address as well as the related information to wireless router,click”set up above contents”.the printer will beep a sound.then restart the printer,wait around 30 seconds,the printer will print a receipt automatically,it means the Wi-Fi setting successfully.
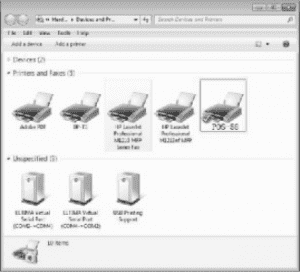
3. Set up driver port for Wi-Fi printer.Click”Start”once,open”Controlpanel”,double click”Printer and Fax”,find the installed printer driver,see the picture as below:
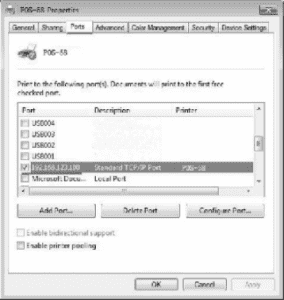
4. Click right key”Properties”of the driver”Port”,choose”IP Port”option,choose the IP port,then click”Application”,see the picture as below:
5. Printing test
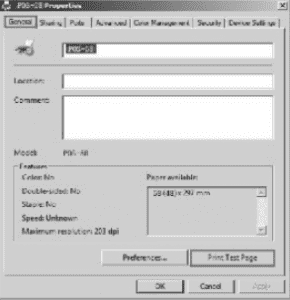
Click”Test printing” in”Normal”option,if the page is printed out,it means that the port configuration is correct.
After completing,the above mentioned procedures,the printer setting has been finished,it can be used for printing.
How to connect to a Wi-Fi printer on a Mac?
If the Wi-Fi network has access restrictions such as MAC address filtering, you need to add the MAC address of the printer to the AirPort base station through the AirPort Utility (located in /Applications/Utilities).
Add a Wi-Fi printer that can select a Wi-Fi network through the built-in controls or screen of the printer
Note: Some Wi-Fi printers may not have the Wi-Fi networking function turned on when they leave the factory. See the documentation that came with the printer for information about enabling Wi-Fi on the printer.
If you can select a Wi-Fi network through the built-in touch screen/buttons/controls of the Wi-Fi printer, please follow the steps below. If you are not sure, refer to the documentation that came with the printer, or refer to the documentation available on the manufacturer’s support website.
Use the built-in touch screen/buttons/controls of the printer to select your Wi-Fi network. If prompted, enter the Wi-Fi password required for the printer to join the Wi-Fi network. The Wi-Fi printer should then be able to connect to the Wi-Fi network. Please refer to the printer documentation or contact the printer vendor for details and support.
In OS X, add a printer through the Add Printer dialog box, or select the printer from the list of adjacent printers in the pop-up menu that prints the form. For details on how to add a printer, please refer to this article.
Add a Wi-Fi printer that cannot be selected via the built-in controls or screen of the printer
Note: Some Wi-Fi printers may not have the Wi-Fi networking function turned on when they leave the factory. See the documentation that came with the printer for information about enabling Wi-Fi on the printer.
You can use the three general methods described below to connect to a Wi-Fi network. Choose the method that best matches the capabilities of your printer; for example, whether the printer can be configured via USB or a dedicated network (if you are not sure, please refer to the documentation that came with the printer).
Method 1: Connect the printer to the Mac temporarily via USB, and then use the printer’s setup assistant to let the printer join the Wi-Fi network (if applicable)
If the printer can be connected to the Mac via a USB cable and the printer setup assistant software is included, you can use the following steps. Otherwise, please consider method 2 or 3.
Connect the printer to the Mac via USB.
Install the software that came with the printer.
Open the Setup Assistant application software installed with the printer software to configure your printer to join the Wi-Fi network.
During the execution of the setup assistant, there should be a step asking you to select a network. Please select the name of the Wi-Fi network you wrote down before. If your Wi-Fi network is protected by a password, please enter the password.
After completing this process, you can disconnect the printer from the USB port on your Mac and delete the USB printer queue you created in the first step.
Open the Print and Fax panel in System Preferences, and then use the + button to add a printer connected to Wi-Fi. For details on how to add a printer, please refer to this article.
If the printer cannot join the Wi-Fi network, please refer to the documentation provided with the printer or contact the supplier for support.
After the printer configuration is complete, you do not need to perform the other steps in this article.
Method 2: Temporarily connect the Mac to the printer’s dedicated Wi-Fi network (if applicable)
If the printer generates a dedicated Wi-Fi network for configuration, and the printer software includes the printer setup assistant application software, you can use the following steps. Otherwise, please consider method 1 or 3.
Note: The dedicated networking function is very useful when configuring the printer to join a Wi-Fi network. However, the private network should only be used to configure the printer to join a regular Wi-Fi network (not to print). Because you cannot access your home Wi-Fi network and Wi-Fi printer at the same time, you should not use it for printing.
Install the software that came with the printer.
Enable the printer’s private network. If necessary, refer to the documentation that came with the printer for more information.
Through the Wi-Fi menu bar item, temporarily associate the Mac with the printer’s private network. If you are not sure about the name of the private network generated by the printer, refer to the documentation that came with the printer.
Open the Setup Assistant application software installed with the printer software, and configure the printer for your Wi-Fi network.
During the execution of the setup assistant, there should be a step asking you to select a network. Please select the name of the Wi-Fi network you wrote down before. If your Wi-Fi network is protected by a password, please enter the password.
After this process is completed, the printer may restart to join the Wi-Fi network.
Re-associate Mac with regular home Wi-Fi network through the Wi-Fi menu bar item in Mac OS X.
Open the Print and Fax panel in System Preferences, and then add a printer via the + button. For details on how to add a printer, please refer to this article.
After the printer configuration is complete, you do not need to perform the other steps in this article.
Method 3: Associate the printer with the Wi-Fi network via WPS (if applicable)
If the printer supports WPS (Wi-Fi Protected Setup) connection, you can use the following steps. If you are not sure, refer to the documentation that came with the printer. Otherwise, please consider method 1 or 2.
If you have an Apple AirPort base station or AirPort Time Capsule, please do the following:
Open AirPort Utility v6.2 or later (located in /Applications/Utilities). Tip: If you have not installed the latest version of AirPort Utility, please install it.
Click the AirPort device icon in AirPort Utility, and then enter the base station password when prompted.
From the base station menu, select Add WPS Printer…
There are two WPS (Wi-Fi Protected Setup) connection types: first attempt and PIN. Please select a connection type supported by the printer. If you are not sure, refer to the documentation that came with the printer.
If the printer supports the first attempt to connect:
If the printer supports PIN connection:
Select the PIN option in AirPort Utility, then click Continue.
Enter the PIN code, which is hard-coded and recorded in the printer or displayed on the printer’s control panel.
In AirPort Utility, select the first attempt option, and then click Continue.
Press the WPS (Wi-Fi Protected Setup) button on the printer. You should see the MAC address of the printer appear in AirPort Utility, click Finish.
If you are using a third-party Wi-Fi router: Please refer to the documentation provided with the router, or contact the supplier for support.
Important information: If the Wi-Fi printer cannot join the network, please refer to the documentation provided with the Wi-Fi printer or contact the supplier for support.
Post time: Mar-12-2021


